
PEWTER TOPPED WEDDING RING POT

time for a new lease of life
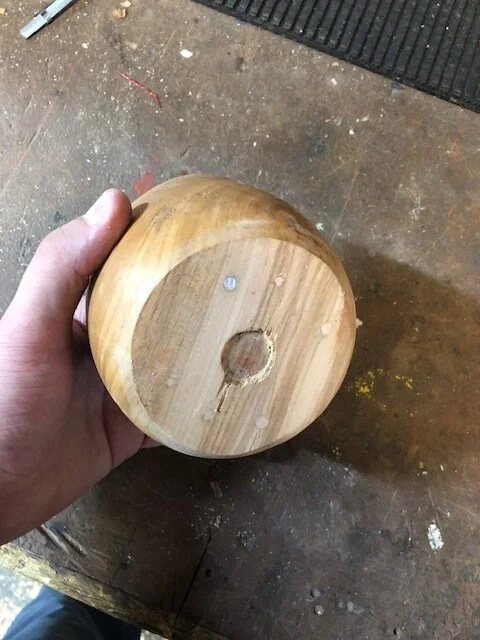
So, I’m showing my colleague this site and the latest items I have been making and we get to taking about her upcoming wedding. She requires a nice box for the rings and has always liked the rustic look. So I suggest that I could make her something, she adds that she has an old piece of live edge at home and brings it in for me to look at, I get asked by her if I can take this old candle holder that she bought from a cheap shop and upgrade it to a ring box. My mind goes into creative mode and I start to formulate. It’s a bit banged up, wax all over the place but I accept the challenge, with a quick wire brushing it was ready to change appearance.
Preparing the Base
I began with sanding the base of the item on my bench sander, until I was happy that it was completely flat and squared across. It was at this point that I noticed a large nail embedded into the outer third of the diameter, it was in very deep and although this didn’t damage the sanding disc, I could see that it wasn’t going to be coming out any time soon, so I stopped at the earliest point and just left it as a feature. With the sanding complete the next thing was to make sure the area was clean and dust free for the next step. To ensure a good mechanical fit to the lathe, it was necessary to hot glue a blank to the base as seen in the next step.

fitting to the lathe
As already detailed in the previous steps, the item was cleaned and a blank of good enough size to make a decent mortise, was attached to the base using hot glue. This is an excellent way to attach items to the lathe as it allows for the waste to be turned away and there is always a good chance the remainder of the blank can be straightened and used again. The item is held in place and centred using the tail stock whilst the glue sets, then the lathe is turned on at a low speed to verify the balance of the item, if the load is off balance it will make it more difficult to turn and the design can suffer. Once sure it is safe, the fun part begins.

two halves as one
Now that the blank was attached to the base of the item, it was going to be a lot easier to turn this on the lathe and get a good clean cut around the circumference of the piece. To start with, I made sure that the piece would sit square and to make sure this was done i added a loose blank to the tail stock end as seen in the photograph. I ensured that the turning left me with a completely round item and that it was as even as possible. Then I took my parting tool and cut through the entire item to the centre somewhere around 2/3 the way up, this meant I had enough material to work with and then hold again on/in the chuck, should that be required. After parting the two pieces from one another, there was the need to get the item back together and sand a little to ensure grain match. It was then ready to remove and individual parts progressed as needed.
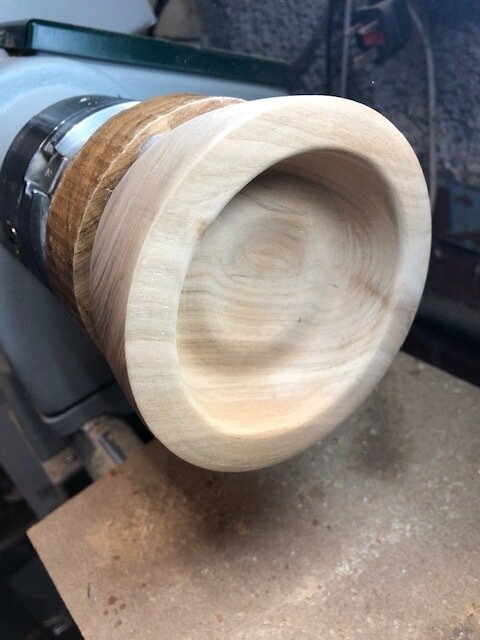
The base hollowed out
The hollowing of the base was fairly simply as the piece to work on was still attached to the blank via the hot glue. This was still secure and allowed me to get straight on without having to chuck-up with a different process. The shape of the internals was something I wanted to play with due to the item(s) this piece would hold. For the first part, it was going to be used to present the rings at church, the second, it would house other jewellery within the family home. With this in mind, I went with a ripple effect in the middle to comfortably hold the rings in the centre when being presented in the ceremony. The outer dip would then separate anything else that would be housed within. The inside needed to be velvety smooth and as such, would need to be sanded and finished in the best way possible to both look and feel good in use.

finishing the base
When finishing items I have a wide choice to choose from and if I haven’t got it in my collection, then, I can always try something new. The finish you envisage in your minds eye isn’t always accessible to you from the get go, but there are ways and means of getting a good finish that either enhance the colour and grain of the wood being used or simply give it a sheen, glossy or even matt finish that is required. For this project I wanted it to have a subtle shine, not too dazzling, not too undone, but a shine that would be easily replaced by the new owner. It was a combination of good sanding from 120 grit all the way through to 600 grit with regular coats of sanding sealer between, finishing off with a good coat of Shellawax, brilliant stuff that can be reapplied or simply rebuffed, as long as I had given it enough coats, which I did, 5 in total.

the lid shaped
The lid needed to have a shape that was going to do two jobs, 1. look good as it was going to be on public show during the wedding, and 2. it needed to have a good fit so as not to slop around or fall off whilst in use. Because of the rustic look to the whole project, I left the shaping and lid tenon stocky, so as to add to the overall look. The inside was shaped so as to mimic the base’s ripple and be smooth and inviting to the touch. The lid was fairly simple to attach to the lathe as there was a recess in the top of the lid that would be used for another part of the design later as seen. I affixed to the lathe using an outward pressure on my chuck and then got to work finalising this part.

the lid finished
So the lid was finished in regards to turning the piece and making ready for finish. As before with the base section of the pot, I used the same techniques and finishes. But, I also had to think about what I would do with the live edge that is on the top section of the lid. this was still going to be left rustic (rough) and as such, I couldn’t just ply the item with loads of finish as it would choke up and look a mess. So instead I took a tooth brush and rubbed in the finish, making sure to get into all the crevices and empty spaces. Then, a second tooth brush, much softer in bristle strength was used to polish up the surface without tearing away any of the woods more natural elements.

two become one (again)
When putting the two parts back together there was a certain buzz as the grains met up quite well an the finish was equal on both ends, these are things that you have to worry about. The fit was good even though the finish was a good few coats. There was no damage occurring from fitting and removal of the parts from each other which means the finish has cured correctly and will last. So the final part was to ensure that the following steps of adding in Pewter to the lid could go smoothly, this involved cleaning out the mortise created in the lid and as best as possible finish it to the point of being able to add the Pewter, without having to go back in and get polish over things unnecessarily.

Pewter insert creation
Pewter, the low melting point material that allows you to polish to a high shine, engrave on it and generally looks great for how little it costs. Its because of that, I wanted to add a little extra to the top of this item, so as they could engrave their wedding ceremony date onto it for a lasting memory. I made a cast from MDF that had the same shape as i wanted make, but with an extra 2mm allowance for cutting, sanding and polishing to final dimension. You can see burn marks on the wood, but this is from the pre-burning of the cast, this stops the expulsion of air from the wood when you pour the molten Pewter into it, which can ruin the casting.

Shaping and polishing
Once the material is cast and cooled it can be squared and flattened to remove the slag that resides on the top of the Pewter. This is easily done with Carbide Lathe Tools and as long as you go easy, you can achieve a good finish straight from the tool. There is a need to remove the wood surrounding the Pewter as well which you can only do once you are happy with the shaping of the leading area. In this case, I slightly domed the surface to help give a more shapely look and bend the light a little more, making it appear more mirror like. The sides were removed and the edges rounded over till they look to disappear underneath, giving a nicer look.

The final piece
The end result is a lovely rustic ring pot with pewter insert for engraving. I enjoyed doing this one, it was a challenge for me and I had not taken up this sort or project before, which taught me a lot through the entire process. The Pewter was a lot of fun and although it was a little messy to polish, (due to the residue that could stain the wood), it is a brilliant material to turn. The overall look is great and the person it was intended for agreed, which was the objective. It was used on the day and has been used since for the exact purpose it was created for. There is no doubt I will make another of these and have been collecting wood for just that occasion.