PEWTER TOPPED OAK POT

the oak blank
I started with a piece of square Oak Blank roughly 100mm Square by 125mm tall, (4” Square by 5” tall). and knocked the corners off slightly with my bandsaw. Then I moved to the lathe and rounded the blank down to smooth, you can get a good finish off the tools if they are kept sharp, this blank had a tendency to chip so I had to keep the tools sharp, which does affect flow, but is worth it in the end. I turn the Blank down to just outside of the dimensions I want my pot to turn out to be.

Recessing the mortise
Once the Blank is turned to the correct shape, allowing for a little extra to be left for final turn once Pewter top is added, there is a need to add a mortise/recess. This allows for the tenon on the Pewter ring that will be created later, to grip into the wood vessel and be glued in place. If this isn’t done now and I continue to finish the pot to final dimensions, I will find it hard to keep the design wanted due to needing to turn the Pewter ring down, to match the inner and outer lip at the rim of the pot.

Designing the cast
Casting Pewter is relatively easy if you plan ahead and act safely, the material melts at a fairly low temperature, but you still need a cast that will withstand the pour. I used the end of my blank to cast but MDF is the preferred method due to its heat resistant properties. The mould I made was a domed groove that would be easy to turn down later, but with an extra groove at the bottom to add a Tenon. This would eventually be the section that would marry with the Mortise on the wood side and be glued together.

Melting the Pewter
The Melting of Pewter only takes about 5-10 minutes, you can pick up ingots of it really cheap from online sellers. It has a very dull look to it in its solid form, but as it melts you get to see the smooth, silvery flow of the liquid loveliness and can guess at the finish of the end product, as already said, a simple camping stove with a heat plate made of aluminium or steel over the top to rest your cast melting pot onto is a good idea. You need to periodically remove the Slag that forms on the surface, be sure to do one final sweep off before the pour starts as it will help stop any bits and bad voids happening. Be sure to dispose of it correctly though.

the pour and casting
Pewter cools very quickly at first, by that I mean that the working time for the pour is fairly short. You have a few seconds to get the actual pour into your cast right before its initial cooling sets in and causes a crust or barrier to form on the outer surface, this can mean that voids and the like can appear in your casting, the best plan is to get a blow torch and heat your cast/mould to very warm before you start the pour, this helps prevent the initial cold start to the outer surface and allows the liquid to flow to everywhere it has to go before it starts to harden. But if you don’t get it right first time, simply chop up the same Pewter and start again.

Adhering the Parts
Once the Pewter is cool and removed from the mould (a light tap usually does it), the two parts now need to be fitted together and held firmly. If this is to be a simple trial piece to formalise a design, then superglue will do as its easy to remove. If the item is to be treasured and a possible heirloom piece, then more care must be taken and a firmer bond will be needed, for this I use a two part epoxy resin, usually in two tubes mixed 1:1 of each, a good spread of it on both parts, wait 30 sec to 1 minute and then push together ensuring a good match up, clamp evenly around the two parts as best as physically possible and then its ready to leave again.

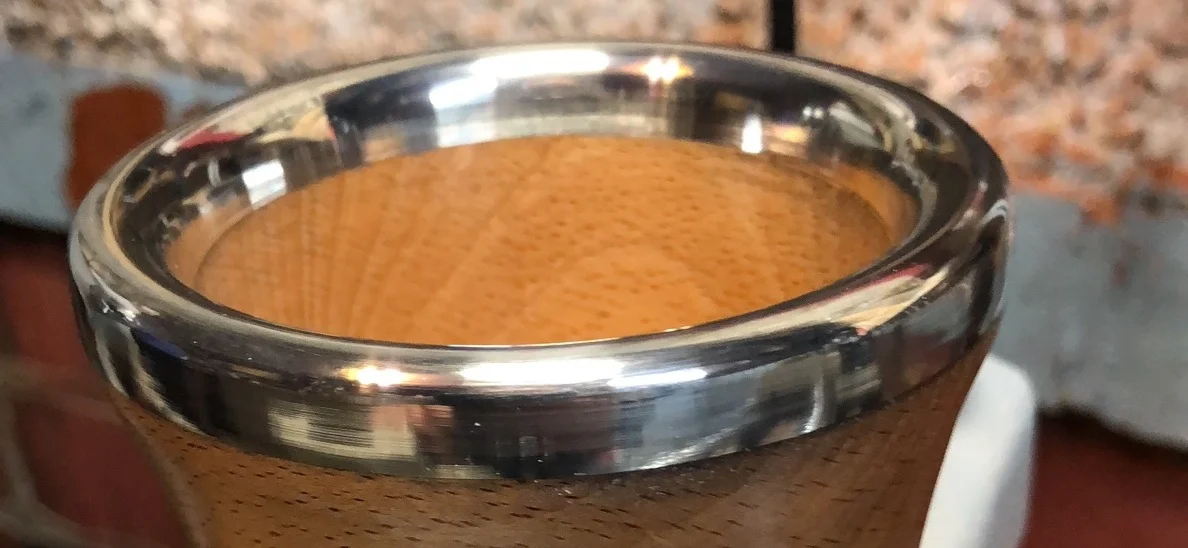
Starting to turn
When the bond is dry between Pewter and wood, the piece is chucked up on my lathe and I’m ready to go. I start to turn at about 800rpm and using a round 12mm carbide tool, I slowly move in and enjoy the stream of metallic ribbons flowing from the tip of the tool. Got to be careful though as this is eager to catch and possibly rip a good deal of effort out of this thing. But slowly I get the Pewter down and start shaping to a nice rounded top. I continue until all the negative spaces have disappeared and I am left with a full rim of beautiful smooth surface, it’ll need a final polish, but its almost there, just need to go a little further to meet the wood.

beginning the finish
When you get down to flush on the inside and the outside of the rim where it meets the Pewter, it’s time to start thinking about finishing techniques. I decided to use my 1” wide sanding rolls at grits 240, 320 and finally 400. From this I then went on to using an abrasive paste (Yorkshire Grit) and made two passes with this, but, although the wood section came out great, the finish on the Pewter still showed a dull shine and very small scratches. I moved onto an automotive metal polish to see if that was any better and it worked great, the shine was there and I had one last go at the wood section with Shellac and I was happy.

the final product
From the start this pot has been designed to simply be a Pewter topped pot, no bells, no whistles, just good blending of different materials. The whole process was very new to me, (well the metal work side) I have turned a good few items and also hand carved but this was different and fun all at the same time. All in, it was about 6hrs work, but every minute was learning and trying my best to stay to the original design I had both in my head and the crude drawing on the side of the Blank that I had started with. It weighs about 0.4kg and is very slightly top heavy, but this gives the piece a quality feel to match the quality finish and overall look.